I forked this guide installing Arch Linux (June 2018).
gloriouseggroll.tv/arch-linux-efi-install-guide
I only followed 75% of his instructions, and modified a few things. He had a few errors this guide will correct.
        /dev/nvme0n1

        /dev/nvme0n1p1   200M EFI System
        /dev/nvme0n1p2     4G Linux swap
        /dev/nvme0n1p3   200G Linux filesystem
        /dev/nvme0n1p4  28.7G Linux filesystem
Pick a drive to install linux on. Format drive with one of three tools (cfdisk, fdisk, gdisk). Cfdisk is the easiest to use. Gdisk is probably the most powerful and hardest to use. Gdisk has a nice feature that wipes the entire drive clean in one command. Then I use Cfdisk to finish the rest.
This will wipe entire drive clean.
x
z
y
y
When you run one of the mkfs commands, that's when it erases all the data.
mkswap /dev/nvme0n1p2
swapon /dev/nvme0n1p2
mkfs.ext4 /dev/nvme0n1p3
mkfs.ext4 /dev/nvme0n1p4
Mount the partitions.
mkdir /mnt/boot
mkdir /mnt/home
mount /dev/nvme0n1p1 /mnt/boot
mount /dev/nvme0n1p4 /mnt/home
Install the Arch base files and development files.
You could just type pacstrap /mnt and that works too.
Generate fstab file, and look at it.
nano /mnt/etc/fstab
Hop off LIVE-USB, and onto new system drive.
I uncommented en_US.UTF-8 on either line #14 or #175
locale-gen
Set your language.
export LANG=en_US.UTF-8
Time zones
ln -s /usr/share/zoneinfo/America/Chicago > /etc/localtime
hwclock --systohc --utc
Set hostname
Enabling multilib and Arch AUR community repositories.
If you are running a 64bit system then you need to enable the multilib repository.
uncomment line #93 and 94. [multilib] Include = /etc/pacman.d/mirrorlist
pacman -Syu
passwd
useradd -m -g users -G wheel,storage,power -s /bin/bash erik
passwd erik
Type this in and it edits the file /etc/sudoers.tmp
You uncomment a line, and add a line at the very end.
%wheel ALL=(ALL) ALL #uncomment
Defaults rootpw #add
I have an Intel i7 8700k CPU. So I need the ucode package. Here's how the bootloader will look at the end of this guide. Skip the 3rd line if you don't have an Intel CPU.
/boot/loader/entries/arch.conf
linux /vmlinuz-linux
initrd /intel-ucode.img
initrd /initramfs-linux.img
options root=PARTUUID=47ce9137-8891-434a-bd7e-1f185bb74c6d rw nvidia-drm.modeset=1
Grab some packages
pacman -S intel-ucode
mount -t efivarfs efivarfs /sys/firmware/efi/efivars
bootctl install
Next, we need to add the PARTUUID of the /root partition to our bootloader configuration. You can get a list of hard drive partitions by typing lsblk.
Skip this part. Only to show/verify what my system looks like. Type in blkid
/dev/nvme0n1p2: UUID="e8058de4-e625-4d30-a66c-cff86065f789" TYPE="swap" PARTUUID="a6c9af9b-1125-4d48-a9b3-d8ca2b62c70b"
/dev/nvme0n1p3: UUID="79a54d05-7694-49ca-a017-8bc4eb36127e" TYPE="ext4" PARTUUID="47ce9137-8891-434a-bd7e-1f185bb74c6d"
/dev/nvme0n1p4: UUID="612dcfc9-02a1-4ff0-8f6c-b6130fe94513" TYPE="ext4" PARTUUID="65dc9735-93ae-c140-b079-48d6f2dbe9a5"
/dev/sdc1: LABEL="backup" UUID="6A4985B551D5BDF0" TYPE="ntfs" PTTYPE="dos" PARTUUID="dd96c158-7381-440b-800a-bbb6db87ab77"
/dev/sdb2: LABEL="storage" UUID="DCAC4A0AAC49DF9E" TYPE="ntfs" PARTLABEL="Basic data partition" PARTUUID="0cc3b7bf-8fd8-49aa-aa32-1556915949a8"
/dev/sda2: UUID="1C5AB5725AB54972" TYPE="ntfs" PARTLABEL="Basic data partition" PARTUUID="f26a20f6-7121-4bcb-9d48-ca66f7646189"
Manually create a config file to add an entry for Arch Linux to the gummiboot manager.
Now type these 4 lines to the arch.conf file.
linux /vmlinuz-linux
initrd /intel-ucode.img
initrd /initramfs-linux.img
We need to add our last line to the boot loader.
Now my arch.conf looks like this. Almost done!
linux /vmlinuz-linux
initrd /intel-ucode.img
initrd /initramfs-linux.img
options root=PARTUUID=47ce9137-8891-434a-bd7e-1f185bb74c6d rw
Now check your ethernet adapter name. Usually the 2nd one, and not 'lo'. Mine is enp0s31f6 and we’re going to enable it via systemctl.
sudo systemctl enable dhcpcd@enp0s31f6.service
For the sake of having a simple graphical interface that works across Desktop Environments, we’ll also install and enable NetworkManager:
sudo systemctl enable NetworkManager.service
We are using the dkms module so that we don’t have to reinstall nvidia drivers for every different kernel if we decide to try another kernel later. To install dkms modules we need the headers for our kernel:
sudo pacman -S nvidia-dkms libglvnd nvidia-utils opencl-nvidia lib32-libglvnd lib32-nvidia-utils lib32-opencl-nvidia nvidia-settings
We will also want to set nvidia drm kernel modules:
Find MODULES=()
Change it so it looks like:
We also need to make sure these are loaded during boot, so next we do this:
Find the line that looks like this:
add nvidia-drm.modeset=1
like this:
Lastly, we need to make a pacman hook, so that any time the kernel is updated, it automatically adds the nvidia module. This will save us a LOT of headache later on. The hooks folder doesn't exist for me, so lets create it.
sudo nano /etc/pacman.d/hooks/nvidia.hook
Add this content, save, and close:
Operation=Install
Operation=Upgrade
Operation=Remove
Type=Package
Target=nvidia
[Action]
Depends=mkinitcpio
When=PostTransaction
Exec=/usr/bin/mkinitcpio -P
Now you should be able to reboot into your system without the USB stick!
Type the following commands and then remove the USB stick:
umount -R /mnt
reboot
My install had a glitch with the swap still being enabled (swapon), and hung forever on reboot. So try this instead before you reboot:
umount -R /mnt
swapoff /dev/nvme0n1p2
reboot
Now we add 3d support, and install X, which is our display manager.
sudo pacman -S xorg-server xorg-apps xorg-xinit xorg-twm xorg-xclock
install KDE
sudo systemctl enable sddm.service
Actually, non of the AUR helpers would be recommended.
The recommended approach is the “Arch” way, which means:
I'm ditching yaourt, and trying the AUR helper called yay. This installs it (delete your leftover yay folder).
cd yay
makepkg -si
Grab some packages (my personal preferences that I want)
yay consolas-font google-chrome p7zip-gui spotify visual-studio-code-bin foxitreader
Clementine music player needs some libs to play audio files (mp3, flac, etc).
sudo pacman gst-plugins-base-libs
sudo pacman gst-plugins-good
yay gstreamer0.10
yay gstreamer0.10-base
yay gstreamer0.10-base-plugins
I've installed a lot of packages. How do I see what I installed?
pacman -Qe # see all packages installed
# if you have sublime text, type in the next 2 lines:
pacman -Qq > mypackagessubl mypackages
wiki.archlinux.org/index.php/Pacman/Tips_and_tricks
expac -H M "%011m\t%-20n\t%10d" $(comm -23 <(pacman -Qqen | sort) <(pacman -Qqg base base-devel | sort)) | sort -n
Make CPU use hyperthreading. Instead of 8% CPU usage using makepkg, it will use 100%.
sudo nano /etc/makepkg.conf
Find BUILDENV=
remove the ! in front of ccache so the line looks like this:
I'm using a 8700k CPU (6 core, 12 threads). -l12 is 12 threads, -j13 is +1 the # of threads.
find MAKEFLAGS=
change it so it looks similar to:
In order for makepkg to use 100% CPU from bash, add these two lines to end of ~/.bashrc
export MAKEFLAGS="-j13 -l12"
For my soundblaster Z card, I must have the pkg gnome-alsamixer. And in order for the settings to be remembered on every reboot, I must download alsa-utils so I can use the command alsactl. Get your device number (it's always 2 or 3 for me).
sudo alsactl store 2
In 2015, I tried linux mint. Loved it, but drivers weren't there.
This summer of 2018, I tried several distros and really liked Mint 18. Then I liked Fedora 28 more, then Kubuntu 18.04
was my fav. Then I tried Manjaro and was the most impressed of all. Least buggy, smoothest install, and most solid.
All distros are bloatware. A Windows 10 install is 25gb.
Manjaro 900 packages, 6 GB install
Antergos 884 packages, 6.4 GB install
Arch 650 packages, 5 GB install
All distros would auto-mount the external drives, but I could not write to them despite having permissions.
In order to write to an external NTFS on arch, you must install the ntfs-3g pkg.
Here is my /etc/fstab file.
# Static information about the filesystems.
# See fstab(5) for details.
# [file system] [dir] [type] [options] [dump] [pass]
# /dev/nvme0n1p3
UUID=79a54d05-7694-49ca-a017-8bc4eb36127e / ext4 rw,relatime,data=ordered 0 1
# /dev/nvme0n1p1
UUID=B6D8-DB33 /boot vfat rw,relatime,fmask=0022,dmask=0022,codepage=437,iocharset=iso8859-1,shortname=mixed,utf8,errors=remount-ro 0 2
# /dev/nvme0n1p4
UUID=612dcfc9-02a1-4ff0-8f6c-b6130fe94513 /home ext4 rw,relatime,data=ordered 0 2
# /dev/nvme0n1p2
UUID=e8058de4-e625-4d30-a66c-cff86065f789 none swap defaults,pri=-2 0 0
#/dev/sdb2
UUID=DCAC4A0AAC49DF9E /run/media/erik/storage ntfs-3g auto,users,uid=1000,gid=985,rw,dmask=027,fmask=137 0 0
#/dev/sdc1
UUID=6A4985B551D5BDF0 /run/media/erik/backup ntfs-3g auto,users,uid=1000,gid=985,rw,dmask=027,fmask=137 0 0
#blkid output:
#/dev/nvme0n1p1: UUID="B6D8-DB33" TYPE="vfat" PARTUUID="909aa21b-262a-2a47-bff2-67c171c64420"
#/dev/nvme0n1p2: UUID="e8058de4-e625-4d30-a66c-cff86065f789" TYPE="swap" PARTUUID="a6c9af9b-1125-4d48-a9b3-d8ca2b62c70b"
#/dev/nvme0n1p3: UUID="79a54d05-7694-49ca-a017-8bc4eb36127e" TYPE="ext4" PARTUUID="47ce9137-8891-434a-bd7e-1f185bb74c6d"
#/dev/nvme0n1p4: UUID="612dcfc9-02a1-4ff0-8f6c-b6130fe94513" TYPE="ext4" PARTUUID="65dc9735-93ae-c140-b079-48d6f2dbe9a5"
#/dev/sda2: UUID="1C5AB5725AB54972" TYPE="ntfs" PARTLABEL="Basic data partition" PARTUUID="f26a20f6-7121-4bcb-9d48-ca66f7646189"
#/dev/sdb2: LABEL="storage" UUID="DCAC4A0AAC49DF9E" TYPE="ntfs" PARTLABEL="Basic data partition" #PARTUUID="0cc3b7bf-8fd8-49aa-aa32-1556915949a8"
#/dev/sdc1: LABEL="backup" UUID="6A4985B551D5BDF0" TYPE="ntfs" PTTYPE="dos" PARTUUID="dd96c158-7381-440b-800a-bbb6db87ab77"
In the above fstab, I would use the string ntfs and it would not work. You have to type in ntfs-3g to be able to write.
These mount settings:
UUID=DCAC4A0AAC49DF9E /run/media/erik/storage ntfs-3g auto,users,uid=1000,gid=985,rw,dmask=027,fmask=137 0 0
...produce these permissions. And now I can write to an external NTFS drive.
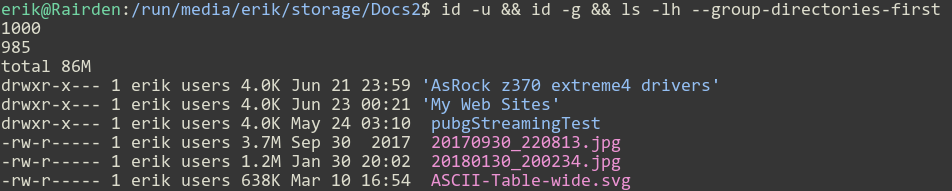
Exported from konsole
erik@Rairden:/run/media/erik/storage/Docs2$ id -u && id -g && ls -lh --group-directories-first
1000
985
total 86M
drwxr-x--- 1 erik users 4.0K Jun 21 23:59 AsRock z370 extreme4 drivers
drwxr-x--- 1 erik users 4.0K Jun 23 00:21 My Web Sites
drwxr-x--- 1 erik users 4.0K May 24 03:10 pubgStreamingTest
-rw-r----- 1 erik users 3.7M Sep 30  2017 20170930_220813.jpg
-rw-r----- 1 erik users 1.2M Jan 30 20:02 20180130_200234.jpg
-rw-r----- 1 erik users 638K Mar 10 16:54 ASCII-Table-wide.svg
Two techniques produce identical results.
First line uses two packages (aha and xsel).
The second line is using a shell script, but formats the html with tons of css in a huge style sheet.
ls -lh --group-directories-first --color=always | ~/ansi2html.sh > ls.html
total 86M drwxr-x--- 1 erik users 4.0K Jun 21 23:59 AsRock z370 extreme4 drivers drwxr-x--- 1 erik users 4.0K Jun 23 00:21 My Web Sites drwxr-x--- 1 erik users 4.0K May 24 03:10 pubgStreamingTest -rw-r----- 1 erik users 3.7M Sep 30 2017 20170930_220813.jpg -rw-r----- 1 erik users 1.2M Jan 30 20:02 20180130_200234.jpg -rw-r----- 1 erik users 638K Mar 10 16:54 ASCII-Table-wide.svg
Setting up Manjaro
Raw .bashrc text files:
Manjaro 17.1 (architect KDE-minimal).
Ubuntu 18.04
Here's my /etc/fstab, /etc/hosts and /boot/grub/grub.cfg files.
Place the bashrc files in both ~/.bashrc and /root/.bashrc
Set up Z shell as default
After you install oh-my-zsh-git package for themeing, set it as default in this file
/etc/passwd
And there's an auto login bug for Manjaro 17.1.11. Fix that by editing the file /etc/sddm.conf for lines #5-9 to
look like this:
# Autologin session
Session=plasma.desktop
# Autologin user
User=erik
Tired of that "watchdog" thing when rebooting taking 1-2mins sometimes?
Edit /etc/systemd/system.conf and uncomment the two lines and set to:
leave RuntimeWatchdogSec at 0
set ShutdownWatchdogSec to 0
echo -e "\n[sublime-text]\nServer = https://download.sublimetext.com/arch/stable/x86_64" | sudo tee -a /etc/pacman.conf
sudo pacman -Syu sublime-text
appnee.com/sublime-text-3-universal.....
gist.github.com/abriemme/8004951
    I used this for sublime 3, 3176 on linux:
    ----- BEGIN LICENSE -----
    sgbteam
    Single User License
    EA7E-1153259
    buy..... this.... software ........
    115F202E 7B91AB2D 0D2A40ED 352B269B
    76E84F0B CD69BFC7 59F2DFEF E267328F
    215652A3 E88F9D8F 4C38E3BA 5B2DAAE4
    969624E7 DC9CD4D5 717FB40C 1B9738CF
    20B3C4F1 E917B5B3 87C38D9C ACCE7DD8
    5F7EF854 86B9743C FADC04AA FB0DA5C0
    F913BE58 42FEA319 F954EFDD AE881E0B
    ------ END LICENSE ------
Install my favorite packages.
yay -S discord
yay -S visual-studio-code-bin foxitreader
yay -S ttf-ms-fonts powerline-fonts-git consolas-font
yay -S intellij-idea-ce jdk
yay -S android-studio
yay -S datagrip
yay -S masterpdfeditor-free
yay -S digimend-kernel-drivers-dkms-git # tablet driver
yay -S onlyoffice-bin
sudo pacman -S yay
sudo pacman -S mariadb
sudo pacman -S pamac
sudo pacman -S mediainfo-gui
sudo pacman -S okteta meld # hex editor and diff viewer
sudo pacman -S graphviz # for UML diagrams in IntelliJ
sudo pacman -S fail2ban filezilla avidemux-qt obs-studio
sudo pacman -S php-apache
sudo pacman -S gparted
sudo pacman -S bind-tools
sudo pacman -S whois
sudo pacman -S krita
sudo pacman -S libvirt
sudo pacman -S virt-manager qemu vde2 ebtables dnsmasq bridge-utils openbsd-netcat
sudo pacman -Rs konversation octopi
#
#
# the best PDF editor I've used is on window10 (Nitro PDF, same as Foxit but allows editing)
fosslinux.com/2484/how-to-install-virtual-machine-manager-kvm-in-manjaro
Sublime text. Add this to your keybinding user settings to tab through parentheses/quotes.
Preferences > Key Bindings ... paste.
gist.github.com/craiggists/2268146
Add Windows OS to grub menu
[erik@Rairden
~
]$
sudo os-prober
/dev/sda2@/efi/Microsoft/Boot/bootmgfw.efi:Windows Boot Manager:Windows:efi
[erik@Rairden
~
]$
sudo update-grub
Generating grub configuration file ...
Found theme: /usr/share/grub/themes/manjaro/theme.txt
Found linux image: /boot/vmlinuz-4.17-x86_64
Found initrd image: /boot/intel-ucode.img /boot/initramfs-4.17-x86_64.img
Found initrd fallback image: /boot/initramfs-4.17-x86_64-fallback.img
Found Windows Boot Manager on /dev/sda2@/efi/Microsoft/Boot/bootmgfw.efi
Found memtest86+ image: /boot/memtest86+/memtest.bin
/usr/bin/grub-probe: warning: unknown device type nvme0n1.
done